Expert Brick and Stone Masonry Services for Lasting Beauty

Charleston Masonry Masters can breathe new life into your outdoor living spaces, enhancing both aesthetics and function. From repairing chimneys to building retaining walls, skilled brick and stone mason contractors can transform your property with timeless beauty that stands the test of time.

Masonry services include a range of tasks, including brickwork, stone masonry, and concrete masonry. Mason contractors use mortar to bind together bricks, stones, and concrete blocks in construction projects.

masonry

Cleaning and Sealing

Masonry is the construction technique that involves stacking bricks, stone blocks, and concrete blocks to create building structures. These materials are bound together with mortar, a mixture of cement, lime, sand, and water, which acts as glue to hold the structure together. The process of masonry involves several tasks, including installation, repair, and restoration of various elements like outdoor steps and brick walls.

Taking care of stone masonry is crucial for keeping it looking beautiful and functioning well. Regular inspections can help spot problems and address them before they worsen. In addition, cleaning and sealing will help protect your stone from the weather and other threats.

Repointing and tuckpointing are important masonry services that help restore the look of brick walls. Over time, the mortar between bricks can deteriorate, leading to cracks and other structural issues. Tuckpointing involves carefully removing and replacing damaged mortar with new mortar that matches the original color and texture of the bricks.

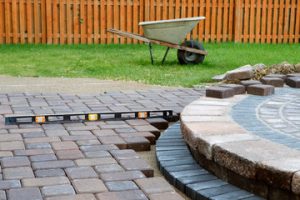
A sandstone or paver walkway is a great way to add an elegant touch to your home. These walkways will not only add to the curb appeal of your property, but they will also reduce the amount of mud, pebbles, and dirt that gets tracked into your house by foot traffic.

Whether you need repairs to your existing sandstone or paver walkway, or you’re looking for a contractor to build a new one for your home, we can help. Our team of expert masons has years of experience building and repairing stone walkways. We can create a custom design to match the style of your home.

Repairing Cracks and Cracked Bricks

Brick walls are a durable and elegant addition to any home, but over time, they can become damaged. Freezing and thawing, water damage, or even a shift in the foundation can cause cracks that weaken the structure of your home and create a safety hazard.

Depending on the type and extent of the damage, there are a few different solutions for repairing brick walls. Hairline cracks can be filled with mortar dyed to match, and larger cracks can be repaired by using a masonry chisel to widen the crack slightly and make it easier for new mortar to bond with the existing surface.

While it may be tempting to simply replace the damaged brick, this can be very costly and invasive. Instead, a professional can repair the mortar joints, preventing future cracking and strengthening the structure of your home.

Expert residential masonry contractors can transform your property with a wide range of stone and brick solutions. From front stairs to retaining walls, patios and walkways to fireplaces, and more. Brick and stone are highly resilient materials that offer lasting beauty and elegance to your property, and our skilled masons will work with you to craft the perfect hardscape design that meets your aesthetic preferences. Contact us today to learn more about our stone and brick solutions and schedule a consultation.

Repointing Bricks

If you notice crumbling bricks or loose mortar, it’s time to get your wall repointed. Repointing involves removing damaged mortar and replacing it with new mortar to prevent water infiltration, which can lead to external damage and internal problems like mold and structural collapse. Repointing also helps your brick structure look its best, while increasing its longevity and overall health.

Professionals understand the nuances of different types of brick and mortar, ensuring that your repointing is done correctly to maintain its integrity. This is especially important when restoring historic buildings, as the right materials will ensure that the structure retains its original character while providing necessary protection.

Repointing requires extensive planning, preparation, and attention to detail. First, you’ll need to carefully remove the existing mortar without damaging the brickwork. This is usually accomplished using hand tools such as a hammer and chisel, rather than power tools, to avoid breaking or chipping the brick’s hard fire-skin that protects its relatively soft core. Next, you’ll need to thoroughly rake the joints clean to a depth that is double the width of the joint. This will help the fresh mortar adhere to the existing brickwork.

You’ll then need to mix the new mortar and water to a consistency that is similar to peanut butter, and then work in small sections. You’ll need to protect the area from rainfall and freezing temperatures during the curing process, which can take up to a week.

Custom Work

Masonry can include a variety of materials, each with its own unique properties and construction methods. It’s important to work with a professional who understands these differences and can deliver the results you want. Look for contractors with extensive experience and a track record of quality work. They should also offer detailed proposals and quotes, including a breakdown of labor costs, so you can understand what you’re paying for.

Brick and stone masonry are two popular construction methods, each offering different aesthetics and functionality. Brick masonry uses bricks bonded together with mortar to create walls, fireplaces, and chimneys. This style offers a classic look and is ideal for both residential and commercial projects. Stone masonry, on the other hand, uses natural stones like granite, limestone, and sandstone to build patios, walkways, and retaining walls. It’s a highly durable material and can add an elegant and refined look to any property.

A reputable stone masonry contractor will be able to design custom structures that will complement the architecture of your property. They can also help you choose the right materials for your project, whether it’s brick, stone, or concrete. They can also repair damaged masonry structures to restore their original beauty and functionality.

The Best Way to Regain Strength After Giving Birth

The best postpartum workout plan starts with a slow, patient reintroduction to physical activity. As soon as you have clearance from your doctor, start with simple low-impact exercises such as walking.

postpartum workout

Avoid high-impact exercise such as running, jumping or HIIT workouts until you have gained more strength. Also, avoid abdominal exercises such as crunches, which can exacerbate diastasis recti. Visit https://www.nourishyourpurpose.ca/ to learn more.

Your core is a key area to rebuild after pregnancy. These exercises will help to re-engage your core and pelvic floor muscles, improve stability, posture and breathing. They’re also great for addressing any abdominal separation (diastasis recti) you may have experienced during pregnancy.

To do these moves, start in a prone position on the floor, with your hands, forearms and elbows in contact with the floor. Breathe into your belly to engage the core and then lift your hips and upper body toward the ceiling, keeping the shoulder blades down. Slowly lower back down. Repeat 10 times.

This exercise reconnects your brain with the deep core muscles, particularly the transverse abdominis. It also strengthens the pelvic floor and lower back. This move is taken from Stage 1 of my postpartum workout plan, FIT Post-Pregnancy. It’s designed for women who are 6-10 weeks postpartum, have received clearance to recommence exercise and are looking to build foundational core and pelvic strength before moving onto more challenging exercises.

If you’re not quite ready to use free weights, you can still build full-body strength with bodyweight exercises like planks and bridges. It’s important to note that it takes time to re-build your strength, so don’t rush and be patient.

The hormone relaxin, which softened your joints and ligaments during pregnancy and childbirth, can remain in your body for up to 12 months after the birth of a baby. This can lead to joint laxity, so it’s important to take your body and recovery seriously and listen for signs that you need to stop or go easier.

A good place to start is with a postpartum fitness program that’s been designed by experts in women’s health and fitness. You can find a variety of reputable online, app and community-based fitness programs that will guide you through safe and effective postpartum fitness. Look for one that addresses diastasis recti and rebuilding the pelvic floor, as well as other common postpartum concerns such as back pain, poor posture and muscle weakness. If you aren’t sure where to start, consider working with a qualified personal trainer who specialises in pre and postnatal fitness to ensure your routine is safe and effective.

Cardiovascular Health

Cardiovascular health training is a vital part of any workout plan, and the postpartum period is no exception. The right routine can help strengthen abdominal muscles, boost energy levels and enhance overall well-being. However, a new mom may be unsure of the safest ways to engage in this exercise. It’s important to seek professional guidance, and work with a fitness expert who specializes in pre- and postnatal training.

It is recommended to start with low-impact activities that are gentle on the joints, such as walking and swimming. Then, gradually increase your duration and intensity as you feel ready. Some new moms find it helpful to use apps and websites that offer guided postpartum workouts and modifications for a variety of different fitness levels.

During this time, it’s also important to focus on strengthening the core and pelvic floor muscles. This can be done through simple exercises such as pelvic tilts, which are done by lying on the floor while attempting to contract the muscles in your lower abdomen as though you were trying to stop the flow of urine. Another great exercise for strengthening the pelvic floor and reducing the risk of incontinence is kegels, which are performed while sitting or lying down. Simply contract the muscles as if you were stopping the flow of urine, hold for three to five seconds and then release.

Other low-impact cardiovascular exercises include walking, cycling and swimming. It’s essential to stay properly hydrated and to avoid any overexertion. If you feel any discomfort during or after a workout, that’s a cue to decrease the intensity or take a break.

Many women are able to begin exercise in the first few weeks after birth, depending on their individual experiences. However, more structured postpartum workouts should only be introduced after the six-week check-up, or earlier if you had a cesarean delivery and medical clearance is received.

Mobility

When it comes to re-establishing a postpartum exercise routine, the first priority should be to target two key areas: pelvic floor strengthening and addressing any ab separation (diastasis recti). Your pelvic floor was supporting a whole lot of extra weight during pregnancy, so this area of your body needs some attention.

As far as addressing any ab separation, kegels are a good place to start. They are simple, effective and a crucial part of the plan to close an ab gap after pregnancy.

Once you’re cleared by your doctor, it’s time to start building up some cardiovascular and strength training. However, it’s important to take things slowly – listen to your body, and only increase your workout duration and intensity as you feel up for it.

A great way to get started is by taking short walks on a flat surface (or even better, a treadmill at the gym). These low-impact exercises will help to get your blood pumping and heart rate up, while helping to strengthen your legs and back.

Swimming is another great cardio option, and one that you can incorporate once your bleeding has stopped and any stitches have healed. It’s also a great upper-body workout, which can be especially helpful as you learn to balance caring for your baby with a busy lifestyle.

During the early weeks, it’s also important to focus on stretching as you build up your fitness levels. Stiffness can occur as a result of your new role as mom, and stretching helps to improve posture, flexibility and movement throughout daily life.

As your body heals and recovers from pregnancy, it’s also a great idea to join an online or in-person community that will support you on your journey. There are several fitness programs designed specifically with pregnant and postpartum women in mind. The Sweat app, for example, offers four post-pregnancy programs that are perfect for juggling parenthood with workouts that you can follow at home.

Other great resources for new and expecting mothers include Postpartum Support International, BabyCenter, Fit4Mom and Pvolve (a workout platform and in-person classes that focuses on core strength, stability and mobility). Just remember, when it comes to reestablishing your fitness after pregnancy, it’s important to take it slow, and always listen to your body.

Flexibility

The act of childbirth takes a major toll on the body. It’s natural to want to hop back into your regular workout routine or start a new one as soon as your Ob/Gyn clears you at your six-week postpartum checkup, but your body will still be healing for quite some time after that. In order to avoid injury, you’ll need to gradually reintroduce exercise into your life and build up your strength.

Incorporating a mix of low-impact cardio, strength training and flexibility is ideal. Walking, swimming or cycling are great examples of LISS (low-intensity steady-state cardio), while bodyweight exercises like squats, lunges and push-ups can help you rebuild your core strength and range of motion. Yoga or Pilates are also excellent options that combine strength and mobility work.

Flexibility training will help ease tension in your hips, shoulders and back – all areas that may feel strained from nursing or carrying your baby. Stretches designed specifically for new moms can be especially beneficial. And don’t forget to incorporate movement that promotes relaxation, such as deep breathing exercises.

Whether you have a full-body strength program or just need to strengthen your core, it’s important to do it safely. This is why I’ve created a special 12-week, full-body strength program that has proven to be safe and effective even for women past the immediate postpartum season — HATCH. This 4-phase, progressive training system uses gradual progression and a focus on core recovery to help you return to high-intensity training without risking setbacks and injuries.

Home Generator Installation – Why It’s Important to Have a Professional Installed

Home generators can keep your refrigerator, sump pumps, furnace, and lights operational when power outages occur. Having these units professionally installed ensures the generator, natural gas line, and transfer switch are properly configured for safe operation.

Generator Installation

Your professional will build a pad for the generator to sit on, and if necessary, get a permit from your local building department. They will also talk to your plumber and electrician about their experience working with outdoor gas lines and generators.

A whole-house generator ensures you have a reliable backup power source in the event of a blackout. It will automatically switch on when the grid goes down and off when it returns. This can ease your stress during power outages and make it possible for you to prepare food, charge devices or use home medical equipment like CPAP machines.

You can get a portable generator that runs on gasoline or one that uses propane or natural gas to provide backup power. A professional can help you determine what size generator is right for your home based on the wattage requirements of the appliances and tools you want to keep running during an outage. Some generators also have surge watts that are required to start appliances like air conditioners, sump pumps or refrigerator motors. These watts are usually 3 or 4 times the running watts, and you will need to calculate them into your total wattage requirement.

The type of generator will also affect how easy it is to install, and the contractor can advise you on this. Portable units need to be located at least a safe distance from the house and other structures, while standby and inverter generators can be installed inside the home or near the electrical panel, where they can connect directly to your existing breaker box through a transfer switch. A contractor will work with your homeowners association or community to find a suitable location for the generator and ensure that it meets any restrictions. They will also work with your local building department to obtain a permit if necessary.

A good contractor will have a track record of customer satisfaction and will be willing to share customer referrals. They will also be licensed and insured, as this is required by the state for projects of this type. You can check online to see how long they have been in business and read reviews, which will give you a sense of their customer service. If you have any concerns, contact the Better Business Bureau to see how they handle complaints.

Preparing Your Home for Installation

A home generator is a wonderful investment that provides peace of mind during power outages. But before you can enjoy the benefits of this backup power, it must be installed and properly maintained. The installation process can seem overwhelming, but a professional licensed electrician can make it a stress-free experience.

The first step in the process is preparing your home for installation. A whole house generator will need a dry, covered area to sit, as well as a way to connect it to your fuel source—either natural gas line or liquid propane/gasoline tank. The best option is to pour a concrete pad where the generator will sit. This will ensure that the generator stays dry, is easy to hook up to your fuel source, and that it can be easily moved when necessary. A licensed electrician will also install a transfer switch, which electrically isolates the circuits in your home that you want to run on the generator from those that are connected to the electric grid.

Choose a location for the generator that is close to your home’s electrical panel to minimize the length of electrical wires that will need to be run. Also consider how much load you intend to place on your generator—the more appliances you plan to run, the bigger the generator you will need. Also be sure to calculate the starting wattages of motor-driven appliances (like furnaces and refrigerators).

Most municipalities require a building permit for the installation of home generators, so be sure that your chosen installer will be able to obtain one within the required time frame. Additionally, you may need to check with your homeowners’ association to see if they have any concerns.

Once your generator is delivered via curbside lift-gate service, you will need to clear the area where it will be installed of any debris, gardening equipment, vehicles, or other items that could obstruct the installation process. Your licensed electrician will then prepare the generator to be integrated into your home’s electrical system, and test the generator for proper function before connecting it to your fuel source.

Installing the Generator

A generator will be installed outside your home and needs to be at least five feet away from any windows, doors, or soffit vents (check local building codes for exact requirements). The generator must also sit on a solid surface that can support the weight and vibrations it produces during operation. Brothers uses a concrete pad specifically for this purpose, and we can help you select the right spot for your generator.

The generator will need to be connected to your home’s electrical system through a transfer switch, which must be installed by a licensed electrician. It’s also important to connect the generator to your fuel source, which is typically a propane tank.

Once the gas and electrical connections are made, the transfer switch will be activated to shift your home’s power from the utility company to your generator during a power outage. The generator will then start running and provide electricity to your critical circuits. Then, it will shut itself off once the power returns to your home.

Your installer will walk you through the entire process, step-by-step. If you have any questions or concerns, be sure to ask the electrician or plumber for clarification. They will likely appreciate your level of engagement throughout the installation.

A home backup generator will ensure that your appliances and safety systems continue to work, keeping you and your family comfortable during a power outage. A professional installer will guide you through the process of selecting a generator that meets your power needs and installing it properly. They will also provide a thorough initial testing of the generator, making sure it works as intended and provides adequate power during an outage. And, they will take care of any necessary permits. Depending on the jurisdiction, this may require a bit of patience but will be worth it in the end! The best part? A generator will save you money on energy bills in the long run. The more you use the generator, the greater the savings will be. Get started on your home generator installation today!

Testing the Generator

Home generators provide a valuable service in that they can help keep your family safe and comfortable during power outages. However, these devices can be dangerous when improperly installed or used. That’s why it’s important to work with a local electrical company that knows how to safely install and use home standby generators.

This is a process that involves running a series of tests on your generator to ensure it can handle the load and deliver reliable, consistent electricity during an emergency. The first step is to turn on the generator and allow it to warm up to its normal operating temperature. It’s also necessary to check the oil level, fuel tank, and coolant tank for any signs of abnormality before continuing.

After the generator is warmed up, our electricians will connect a heavy-duty, waterproof electrical cable to it. This will run from the generator to where your main electrical panel is located. They will then install something called a transfer switch, which sends power from the generator to your home when the switch is activated during a power outage.

The next step is to perform a load test. This is done by connecting the generator to a variable load bank, which simulates various power demands on the generator. The test begins at 25% load and then increases incrementally to 50%, 75%, and 100% load over a set period of time. The result is a record of how the generator performed under these different conditions and provides confidence that it will be able to reliably operate in a real power outage.

How often you need to do a load test will vary depending on the guidelines of your generator’s manufacturer and the regulations of the area where your home is located. In general, though, it’s a good idea to do one every year or so, and more frequently if your generator is used for critical applications like powering healthcare facilities and hospitals. Once the test is complete, it’s important to follow the manufacturer’s guidelines for cooling down the generator and load bank.